(Chroma @ Dec. 06 2006,15:35)
QUOTE
(Story to come, I mean it!)
Yeah right.

| Tactical Command http://www.tacticalwargames.net/taccmd/ |
|
| [Red Queen] Red Queen Rising Battle 10 http://www.tacticalwargames.net/taccmd/viewtopic.php?f=21&t=8077 |
Page 1 of 2 |
| Author: | Chroma [ Wed Dec 06, 2006 9:32 pm ] |
| Post subject: | [Red Queen] Red Queen Rising Battle 10 |
Got in the tenth Red Queen Rising campaign game yesterday, and it was a 4000 point doozy! We played a "follow-up" scenario to the previous Imperial Guard mission in Battle 7 where the Imperial Supreme Commander found himself surrounded by Tyranids on all sides! Imperial Guard forces started with around half the Tyranid's 4000 points with 2300 points of Blood Angel relief forces arriving on Turn 3. As well, the Imperial's had an "off-board" artillery Titan that they could call in by plotting target co-ordinates at the end of each turn. More details to come (in a while, Hena!). |
|
| Author: | Chroma [ Wed Dec 06, 2006 9:35 pm ] |
| Post subject: | [Red Queen] Red Queen Rising Battle 10 |
Desperation - prologue (Story to come, I mean it!) |
|
| Author: | Dwarf Supreme [ Wed Dec 06, 2006 9:38 pm ] |
| Post subject: | [Red Queen] Red Queen Rising Battle 10 |
(Chroma @ Dec. 06 2006,15:35) QUOTE (Story to come, I mean it!) Yeah right.
|
|
| Author: | ragnarok [ Wed Dec 06, 2006 9:54 pm ] |
| Post subject: | [Red Queen] Red Queen Rising Battle 10 |
(Chroma @ Dec. 06 2006,20:32) QUOTE More details to come (in a while, Hena!). Does that mean I can moan and ask for it now? 
|
|
| Author: | Chroma [ Wed Dec 06, 2006 10:28 pm ] |
| Post subject: | [Red Queen] Red Queen Rising Battle 10 |
Battle 10 - Desperation Scenario: Holdout Defenders - Imperial Guard ~2000 points Attackers - Tyranids - 4000 points Relief - Blood Angels - 2300 points - Turn 3 Arrival Imperial Supreme Commander formation must survive the game. Rules Used: All experimental rules. Blood Angels v2.0 with Marine 1.1 changes Tyranids 7.1 Harridan 3DC Special Rules: "Mixed Imperial Forces" Imperial Strategy Rating goes from 2 to 4 when Blood Angels arrive. "Favour of the Queen" One Synapse group, and associated Brood creatures, gains invulnerable saves. "Emperor's Wrath" - Off-board artillery Titan 1 pre-plotted 3BP Large Barrage Template MW per turn. Co-ordinates marked as per Orbital Bombardment before each turn. "Motor Pool" Chimeras are formed into an independent formation that may transport any other infantry formation. Restrictions No Synapse Nodes. Imperial Forces made of survivor formations from Battle 7. |
|
| Author: | Chroma [ Wed Dec 06, 2006 10:51 pm ] |
| Post subject: | [Red Queen] Red Queen Rising Battle 10 |
Cut-off Imperial Command - ~2000 points Regimental HQ (On Foot) 12 Guardsmen 1 Supreme Commander 1 Commissar 1 Hydra Mechanized Transport 7 Chimeras Under Strength Tank Company 5 Leman Russ 1 Vanquisher Warhound Group 1 Warhound Titan Baneblade 1 Baneblade 2 Fortifications 500 mm Barbed Wire 4 Gun Emplacements Emperor's Wrath Off-board artillary Titan 1 pre-plotted 3BP Large Barrage Template MW per turn. Blood Angel Death from Above - 2300 points Tactical Detachment HQ Commander Drop Pods Tactical Detachment Bravo Drop Pods Death Company 4 Death Company 1 Chaplain Drop Pods Terminator Detachment Commander 4 Land Raiders Landing Craft Strike Cruiser Ravenous Tyranid Swarm - 4000 points Assault Group 1 3 Tyranid Warriors 4 Gargoyles 3 Raveners 4 Termagants 4 Hormagaunts Assault Group 2 3 Tyranid Warriors 4 Gargoyles 2 Raveners 4 Termagants 4 Hormagaunts Assault Group 3 3 Tyranid Warriors 4 Gargoyles 3 Raveners 6 Termagants 4 Hormagaunts Attack Group 1 - (Favour of the Queen) 1 Hive Tyrant 2 Raveners 7 Carnifex (Screamer-Killers 2 Zoanthropes Attack Group 2 1 Hive Tyrant 2 Raveners 2 Dactylis 4 Biovores 3 Zoanthropes Attack Group 3 1 Hive Tyrant 2 Raveners 2 Exocrine 2 Malefactor 3 Zoanthropes Harrassment Group 1 Harridan Hierophant Lictor Swarm 1 5 Lictors Lictor Swarm 2 4 Lictors Spawning Pool 1 Scythed Hierodule 11 Mycetic Spores |
|
| Author: | Chroma [ Thu Dec 07, 2006 1:47 am ] |
| Post subject: | [Red Queen] Red Queen Rising Battle 10 |
Deployment 4x6 Table The Imperial Guard forces were deployed as shown, with the Regimental HQ nestled securely in the Cathedral  All Blood Angel forces were kept in reserve on board the Strike Cruiser, with the Terminators and Land Raiders in the Landing Craft. Tyranids kept the two Lictor Swarms in reserve. |
|
| Author: | Chroma [ Sat Dec 09, 2006 3:26 am ] |
| Post subject: | [Red Queen] Red Queen Rising Battle 10 |
I'll try and post some stuff tomorrow. My 'Net was down all afternoon/evening. I'm currently at my girlfriend's about to watch a movie. Thanks for your patience! |
|
| Author: | Pipboy [ Sun Dec 10, 2006 6:59 pm ] |
| Post subject: | [Red Queen] Red Queen Rising Battle 10 |
Still waiting.... PS: I guess I should have warned Dave that those Blood Angels are cursed - and I don't mean the Black Rage or the Red Thirst... |
|
| Author: | Chroma [ Sun Dec 10, 2006 7:29 pm ] |
| Post subject: | [Red Queen] Red Queen Rising Battle 10 |
Turn 1 No teleports. Strategy Roll: Tyranids Assault Group 1 scampers towards their prey at a march, rapidly closing the distance. Seeing the massive xenos swarm approaching and hoping to sell their lives dearly, the Regimental HQ goes on overwatch. Assault Group 2 also marches forward, hungry for bio-matter. Maintaining position, the Chimeras go on overwatch as well. Assault Group 3 marches forward, but there's still a long way to go! Feeling relatively safe in their entrenchments, the Tank Company goes on overwatch. The lumbering bulk of Attack Group 1 marches down the road, snarling and drooling. Realizing the road may be the focus of the Tyranid advance, Baneblade 1 marches to the T-intersection in front of the Cathedral and parks itself as a mobile bunker in the way. Attack Group 3 marches up the Tyranid right flank hoping to eventually envelope the soft prey-things. Baneblade 2 advances towards Attack Group 2, but its long range shots have no effect on the gribbly horde. Attack Group 2 marches forward, trying to get its bio-artillery into range. The Warhound Titan doubles forward and fires on Assault Group 2, taking out a single Ravener. The Harridan flaps into range on a double and drops a Void Shield from the Warhound. The Tyranids have moved much more quickly than expected and the shells from Emperor's Wrath's long range cannon punish the forested hills, completely missing the approaching Tyranids. A bit shaken by the nearby shelling, the Hierophant merely makes a single move down the road instead of marching forward? End of Turn: All Imperial formations rally. With the help of a spore, the Harridan spawns a Scythed Hierodule and Assault Group 2 gets back their lost Ravener. |
|
| Author: | Chroma [ Sun Dec 10, 2006 8:14 pm ] |
| Post subject: | [Red Queen] Red Queen Rising Battle 10 |
Turn 2 No teleports. Strategy Roll: Imperial Emperor's Wrath's cannons are much more accurate this time, landing smack in the middle of Attack Group 1 and blowing away 2 Raveners and 3 Carnifex! The Warhound falls back to the T-intersection to support the Baneblade and lets loose on the Harridan, doing 1DC damage to the Scythed Hierodule. Attack Group 2 sustains fire, dropping spore bombs on both the Chimeras and the Imperial HQ, 1 Infantry squad succumbs and 2 Chimeras are rendered combat ineffective. Attack Group 3 tries to double forward, but fails to make much progress and makes a single move towards the enemy. Baneblade 1 locks on to the Harridan, sustaining fire, but the great beast is unharmed. The Harridan replies by doubling forward to catch both the Warhound and Baneblade 1 in a blast, the Infantry HQ also fires on overwatch, but no damage is done by either side. Baneblade 2 doubles over to help, but its fire on the Harridan is also ineffective. Attack Group 1 marches forward, hoping to come to grips with the enemy. The Tank Company doubles from cover to fire on the Harridan's war engine swarm and they manage to drop the Scythed Hierodule in its tracks.  Attack Group 2 tries to make up time, but fails to move very quickly and just slowly approaches the enemy. The Chimeras marshal, removing all their Blast markers, and fire ineffectively at the Harridan. Assault Swarm 1 marches into the cover of the Tank Factory. Assault Group 3 marches into the ruined Cathedral. The Hierophant takes its sweet time, again failing to march and just leisurely moving forward. End of Turn: All Imperial formations rally. Attack Group 1 uses a spore to resurrect the Scythed Hierodule. |
|
| Author: | Chroma [ Sun Dec 10, 2006 9:46 pm ] |
| Post subject: | [Red Queen] Red Queen Rising Battle 10 |
Turn 3 No teleports. Strategy Roll: Imperial The Emperor's Wrath continues to blast the same area, this time striking Assault Group 2: 1 Gargoyle, 1 Hormagaunt, 1 Termagant, 1 Ravener, and 1 Tyranid Warrior are all turned to pulp. (Was quite funny that my opponent managed to kill one of each type of creature in the swarm. *laugh*) Baneblade 1 sustains fire on the Harridan, but the great beast shakes off the hits. Enraged, the Harridan then engages Baneblade 2. The super-heavy tank has the support of the Chimeras and the Infantry HQ, but, despite doing 1DC to the huge creature, the Harridan tears the tank apart. Assault Group 1 engages the Tank Company, but none of the Bugs are able to get into the buttoned-up tanks and the Leman Russ crews gun down 2 Hormagaunts and 2 Raveners, forcing the Tyranids back to the cover of the Tank Factory. 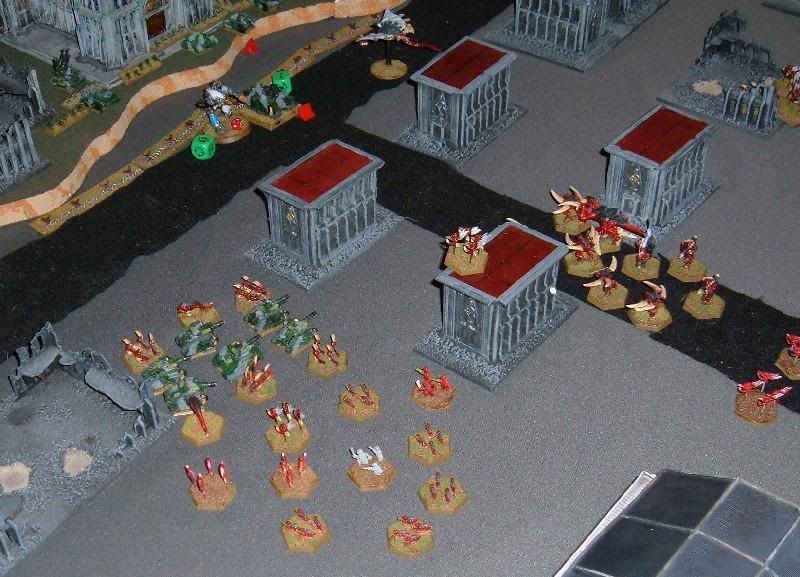 There is a rumble of thunder as the Strike Cruiser arrives, dropping an orbital bombardment on Attack Group 1 and Assault Group 2. The first loses 1 Carnifex while the other loses 1 Hormagaunt and 3 Gargoyles.  And then come the Drop Pods! The Death Company's landing takes out 1 Gargoyle an 1 Termagant from Assault Swarm 1, while the two Tactical Companies' Deathwinds hit Assault and Attack Swarms 1 to no effect. 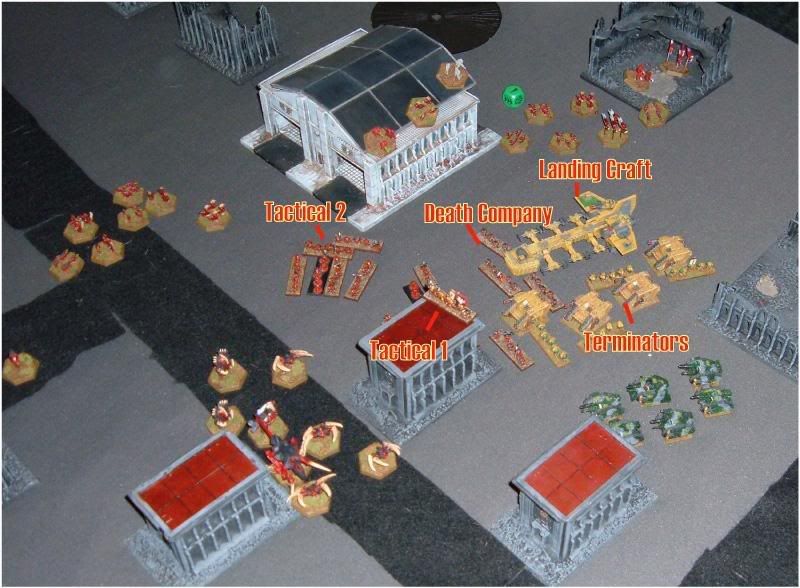 The Commander of Tactical Company 1 takes the Death Company and Tactical 2 on a combined assault against the Queen's Favoured Attack Swarm 1.  It is a complete debacle for the noble Blood Angels as the Marines are thoroughly trounced. Two survivors from Tactical 1 are all that remain to flee into the landing bay of the Landing Craft. The only bright spot being that the Death Company Chaplain was able to take out the Hive Tyrant, causing all the Brood creatures, including the Hierodule, to go to ground. A wave of hopelessness washes over the Imperial forces. Assault Group 2 attempts to engage the Landing Craft, but they are easily beaten back by the grounded flying fortress and leave 1 Hormagaunt and 3 Termagants behind.  Getting desperate, the Russes advance to fire on the Harridan and actually manage to knock it from the sky. Attack Group 2 sustains fire on the Infantry HQ and Chimeras again, but only manage to kill a single unit of Guardsmen. The Infantry HQ marshals, moving back away from the encroaching horde of xenos and removes all Blast markers. Assault Swarm 3 performs a long distance assault and engages the Chimeras. The 'Nids lose 2 Hormagaunts, 1 Gargoyle, and a Ravener to support fire, but still manage to wipe out the Imperial APCs. The Landing Craft sustains fire on Assault Swarm 1, killing 2 Termagaunts. Attack Group 3 doubles towards the Terminators and takes out 1 Land Raider. The Warhound advances to fire on Assault Swarm 1, but only kills a Termagaunt. The Hierophant doubles down the road to spray the Terminators, but only manages to place a Blast marker. The Terminators sustain fire on the Hierophant, knocking it down to 3DC. End of Turn: Blood Angel Tactical Company 1 fails to rally and the Landing Craft stays on the ground. The Hierophant regenerates 2DC. There is much failed spawning for the Tyranids. |
|
| Author: | Chroma [ Sun Dec 10, 2006 10:10 pm ] |
| Post subject: | [Red Queen] Red Queen Rising Battle 10 |
Turn 4 Both Lictor swarms show up on either side of the Infantry HQ?  Strategy Roll: Tyranids! Lictor Swarm 1 pounces on the distracted Infantry HQ, slashing and shredding the hapless Guardsmen. ?The Imperials manage to take out 1 Lictor, but they are still routed and scatter in disarray, no longer a cohesive formation. Feeling cocky, Lictor Swarm 2 engages the Tank Company. ?One Lictor gets torn apart by barbed wire, but the other three each take out a Leman Russ! ?Unfortunately for the Lictors, each of the remaining three Leman Russ take out a Lictor! ?The Imperials win, but are still broken by their losses. The Warhound advances on the Hierophant and uses plasma to burn 2DC off the Bio-Titan. The Terminators sustain fire on the wounded Hierophant and finally put it down.  Attack Swarm 2 sustains fire on the Landing Craft but does no damage. Assault Swarm 1 attempts to engage the battered Landing Craft, but none of the 'Gaunts want to get close to it. ?In a fit of pique, one of the Warriors fires at the Marine dropship? and hits something vital as the entire war engine explodes, taking out a nearby Land Raider and the Terminator Captain in the blast! ?The 'Gaunts just chitter and giggle.  The last remaining Baneblade sustains fire on Assault Swarm 3, but only manages to take out a Gargoyle. Drawn by the fire, Assault Swarm 3 swarms over the Baneblade, breaching the engine. ?A Gargoyle and a Termagant are gunned down, and the catastrophic failure of the engine kills a Hormagaunt, but the Tyranids are successful. Fire from the Emperor's Wrath pounds down on the Cathedral, blasting apart the Lictors that attacked the Infantry HQ, killing them all, but too late to turn the tide of battle? End of Turn: Major Tyranid victory. |
|
| Author: | illuvitar [ Mon Dec 11, 2006 12:39 am ] |
| Post subject: | [Red Queen] Red Queen Rising Battle 10 |
wow, i hope those bugs are hungry !! what a mess, blood everywhere ! 
|
|
| Page 1 of 2 | All times are UTC [ DST ] |
| Powered by phpBB® Forum Software © phpBB Group http://www.phpbb.com/ |
|